The floor felt dry. The carpet looked fine. The walls showed no visible water stains.
The homeowner was ready to move furniture back in and call it done.
Then I pulled out the thermal camera.
The screen lit up in bright yellows and oranges—moisture trapped behind the wall cavity, invisible to the naked eye. Wet insulation. Damp timber framing. All hidden beneath a perfectly dry-looking surface.
If we’d stopped there? Mould would have appeared within 2-3 weeks. The “simple” $2,500 water extraction job would have become an $8,000+ mould remediation disaster.
This is what thermal imaging reveals. And this is why most restoration companies in Melbourne don’t want to talk about it.
Here’s what 13+ years of using thermal imaging for structural drying has taught me about hidden moisture, mould prevention, and why seeing with heat is better than seeing with your eyes.
Why Most Water Damage Companies Don’t Use Thermal Imaging
Let me be honest about something uncomfortable in our industry.
We’ve been using thermal imaging cameras since 2011. That’s 13+ years of experience finding hidden moisture that would have destroyed properties if left undetected.
But most of our competitors don’t use thermal imaging. Or they own a camera but don’t mention it. Or they use it but don’t really understand what they’re seeing.
Why?
Reason 1: Cost (But Not What You Think)
A professional thermal imaging camera costs $3,000-$8,000. That’s not insignificant, but it’s not prohibitive either.
When Richard decided to invest in thermal imaging in 2011, his reasoning was simple: “If you want to do a job right, it’s a small investment for a professional restoration technician.”
The real cost isn’t the camera. It’s what the camera reveals.
Reason 2: It Reveals More Work
Here’s the uncomfortable truth: Thermal imaging often shows that water damage is worse than it appears.
That “small” washing machine leak? Thermal imaging reveals it spread into the wall cavity. Now you need wall drying, not just carpet drying.
That burst pipe? Thermal imaging shows moisture in the ceiling insulation. Now you need ceiling cavity drying too.
For some restoration companies, this creates an awkward conversation:
“Good news: your carpet is dry. Bad news: our camera shows hidden moisture in your walls that will cause mould if not addressed. That’ll be an extra $2,000.”
Some companies avoid this awkwardness by simply not using thermal imaging. They dry what’s visible. They leave. If mould appears in three weeks, well, that’s a new job to quote on.
Reason 3: It Slows Down the Process
Thermal imaging takes time. You need to:
- Scan all affected areas methodically
- Interpret what the camera shows
- Explain findings to the homeowner
- Adjust your drying strategy accordingly
- Re-scan during the drying process
- Verify with thermal imaging before completion
For companies focused on speed and volume, thermal imaging is inefficient.
For companies focused on actually solving the problem (like us), it’s essential.
Reason 4: Ignorance
Some restoration companies genuinely don’t understand the value of thermal imaging. They think moisture meters are enough.
They’re wrong. And I’ll show you why.
How Thermal Imaging Works (Without the Technical Jargon)
You don’t need to understand infrared radiation wavelengths to understand why thermal imaging matters for water damage.
Here’s the simple version:
Everything has a temperature. Your walls. Your carpet. Your ceiling. Even moisture.
Wet materials have different temperatures than dry materials. Water conducts heat differently than dry building materials. This creates temperature differences.
Thermal cameras see temperature differences as colors. Usually:
- Blues and purples = cooler areas (often wet)
- Yellows, oranges, reds = warmer areas (often dry)
What this means in practice:
Your eyes see: A wall that looks completely normal.
Thermal camera sees: A blue/purple patch showing that section of wall is cooler than surrounding areas = moisture trapped inside the wall cavity.
Your eyes see: Carpet that feels dry to touch.
Thermal camera sees: Orange (dry) in the center, blue (wet) in the corners where moisture is trapped under baseboards.
Your eyes see: Ceiling with no visible water damage.
Thermal camera sees: Large blue area showing insulation in the ceiling cavity is saturated with water.
According to the IICRC (Institute of Inspection, Cleaning and Restoration Certification), thermal imaging is considered an industry best practice for comprehensive moisture assessment in water damage restoration.
The camera doesn’t lie. Your eyes do.
What Your Eyes Can’t See (But Thermal Imaging Reveals)
Let me walk you through the places moisture hides—and why your naked eye or sense of touch simply cannot detect it.
Hidden Area #1: Behind Walls
What happens: Water from a burst pipe or washing machine leak spreads across the floor. It hits the baseboards. It wicks up into the wall cavity behind the plaster or drywall. Now you have wet timber framing, wet insulation, wet wall cavities.
What you see: Walls that look completely normal. Maybe slightly damp at the baseboard level, but that’s drying out.
What thermal imaging sees: Temperature differences showing moisture 30-60cm up inside the wall cavity. Areas your eyes will never see without demolition.
Why it matters: Wet wall cavities are mould factories. Enclosed space. No airflow. Perfect humidity. Within 2-3 weeks, you’ll have mould growing inside your walls. By the time you smell it or see it, the problem is extensive.
Real cost:
- Drying walls properly now: +$1,000-$2,000
- Mould remediation in 3 weeks: $5,000-$10,000+ (including wall removal, mould treatment, reconstruction)
Hidden Area #2: Under Flooring
What happens: Water soaks through carpet into underlay. It pools on the subfloor beneath. If you have timber floorboards, they absorb moisture. If you have concrete slab, water sits in depressions.
What you see: Carpet that feels damp on top, maybe slightly spongy underfoot.
What thermal imaging sees: Temperature map showing exactly where water is pooled underneath, how far it’s spread, and which areas of subfloor are saturated.
Why it matters: You can dry the carpet surface perfectly. But if the subfloor is still wet, moisture will wick back up into the carpet. Within days, it’s damp again. Plus, wet timber floorboards can warp, buckle, and rot.
Real cost:
- Proper subfloor drying now: +$800-$1,500
- Replacing warped/rotted floorboards later: $3,000-$8,000+
Hidden Area #3: In Ceilings
What happens: Water from upstairs bathroom, burst pipe in ceiling, or roof leak saturates ceiling insulation. The insulation holds water like a sponge. The ceiling plaster/drywall might look fine, but above it is a soaking wet mess.
What you see: Maybe a small water stain on the ceiling. Maybe nothing at all if the water spread laterally through the insulation before reaching the ceiling surface.
What thermal imaging sees: Large areas of cooler temperature showing where insulation is saturated. Often 3-4 times larger than any visible staining.
Why it matters: Wet ceiling insulation is heavy. It can cause ceilings to sag or collapse. And it’s a perfect environment for mould. Plus, if electrical wiring runs through that space, you have potential safety issues.
Real cost:
- Ceiling cavity drying now: +$1,500-$3,000
- Ceiling collapse repair + mould remediation: $8,000-$15,000+
Hidden Area #4: In Crevices and Structural Gaps
What happens: Water finds its way into gaps between floorboards, under skirting boards, into expansion joints, behind built-in cabinetry, under bathroom vanities.
What you see: Nothing. These areas aren’t visible or accessible.
What thermal imaging sees: Cool spots indicating trapped moisture in spaces you can’t access.
Why it matters: These are the areas that cause the mysterious “Why does my house smell musty?” problems six months after water damage. Moisture trapped in inaccessible areas slowly develops mould. You can’t see it. But you can smell it. Eventually.
According to Master Builders Australia, hidden moisture in building cavities is one of the leading causes of building defects and mould-related health issues in Australian homes.
The Brighton Mansion Story: When Thermal Imaging Saves an Irreplaceable Carpet
Let me tell you about one of our most memorable jobs.
Brighton. Federation-era mansion in the golden mile. A surgeon’s home. Beautiful property, period features, high ceilings.
The ensuite toilet backflowed. Sewage spread across the master bedroom floor, soaking a special-commission Italian carpet worth $10,000.
Category 3 water damage (sewage). Most restoration companies would say: “Replace the carpet. It’s contaminated. Not worth trying to save.”
But this wasn’t just any carpet. It was recently laid. Custom imported. Irreplaceable without waiting months for another commission from Italy.
We decided to try saving it.
The Process:
Day 1: Emergency extraction of contaminated water. Specialized decontamination treatment. Initial drying equipment installed.
The thermal imaging scan revealed something crucial: The water had spread further than visible. Into the adjoining hallway. Under the skirting boards. Into the wall cavity at the baseboards.
Without thermal imaging, we would have missed approximately 30% of the affected area.
What would have happened: We’d have dried the visible damage. Walked away. Within two weeks, mould would have started growing in that hidden moisture under the hallway skirting boards. Within a month, the smell would have been obvious. The homeowner would have needed wall removal to find the source.
What we did instead: Extended our drying equipment to all areas shown by thermal imaging. Applied decontamination treatment to the entire affected zone, not just what was visible.
Days 2-3: Two more decontamination treatments (three total). Daily thermal imaging scans to monitor drying progress. Equipment repositioned based on thermal imaging data.
Result: Carpet completely decontaminated and dried. Zero odor. Zero contamination. $10,000 carpet saved. Hidden moisture in hallway and walls completely dried before mould could develop.
The homeowner cried with relief. That carpet had sentimental value beyond its monetary worth.
Without thermal imaging, we would have:
- Saved the visible carpet
- Missed the hidden moisture
- Left the property vulnerable to mould
- Created a much bigger problem in 2-3 weeks
With thermal imaging, we:
- Identified all affected areas
- Dried everything completely
- Prevented mould before it started
- Delivered a complete solution
This is why thermal imaging isn’t optional for us. It’s how we do every structural drying job.
Thermal Imaging + Moisture Meters: Why You Need Both
Some people think thermal imaging replaces moisture meters. It doesn’t.
Thermal imaging and moisture meters are complementary technologies. You need both.
Here’s how they work together:
Thermal Imaging = The “Where”
What it does: Shows you WHERE moisture is located. Gives you the big picture. Maps out affected areas quickly.
Strengths:
- Scans large areas in seconds
- Non-invasive (no holes, no contact needed)
- Finds hidden moisture behind surfaces
- Shows moisture patterns and extent
- Creates visual documentation (photos customers can understand)
Limitations:
- Doesn’t tell you HOW wet
- Can’t penetrate metal surfaces
- Needs temperature differential to work
- Requires proper interpretation
Moisture Meters = The “How Much”
What it does: Measures exact moisture content as a percentage. Tells you HOW wet materials are.
Strengths:
- Precise numerical readings
- Track drying progress objectively
- Know when materials are truly dry (target: below 15% for most building materials)
- Industry standard for verification
Limitations:
- Requires direct contact with material
- Only measures the specific spot you’re testing
- Doesn’t show you the bigger picture
- Can miss moisture if you don’t test the right spots
How We Use Both Together:
Step 1: Thermal imaging scan to identify ALL affected areas (the “where”)
Step 2: Moisture meter readings in identified areas to measure severity (the “how much”)
Step 3: Install drying equipment based on both thermal and moisture data
Step 4: Daily moisture meter readings to track drying progress
Step 5: Daily thermal imaging to ensure we’re not missing anything
Step 6: Final thermal imaging scan + moisture meter verification before equipment removal
This combined approach is the professional standard. Companies that use only one or the other are giving you incomplete information.
Learn more about our professional equipment and technology
The Mould Prevention Timeline (Why Speed + Technology Matter)
Here’s what happens after water damage, hour by hour:
Hours 0-24: The Window of Opportunity
Water is present. Mould spores are everywhere (they’re always in the air). But they haven’t germinated yet.
Action needed: Extract water. Begin drying. Use thermal imaging to map extent.
If you act in this window: Relatively straightforward restoration. Minimal risk of mould.
Hours 24-48: The Danger Zone
Mould spores begin to germinate in warm, damp environments. They’re establishing themselves but not visible yet.
Action needed: Aggressive drying. Dehumidification. Address ALL moisture (including hidden).
If you act in this window: Still good chance of preventing mould. But you need to dry EVERYTHING, including hidden moisture.
Hours 48-72: Point of No Return
Mould is actively growing. Still might not be visible, but it’s there. Microscopic colonies multiplying.
Action needed: Professional assessment. Likely need antimicrobial treatment along with drying.
If you act in this window: Damage control mode. Prevent it from getting worse. Some remediation likely needed.
Beyond 72 Hours: Full Remediation Required
Visible mould growth. Musty smell. Health risk developing. Simple water damage has become mould disaster.
Action needed: Professional mould remediation (different process than water damage restoration). Potential health hazard. Much more expensive.
According to Better Health Victoria, exposure to mould can cause respiratory issues, allergic reactions, and other health problems, particularly for children, elderly, and those with compromised immune systems.
The cost difference:
- Act within 24 hours: $1,500-$3,500 for water extraction and drying
- Act within 48 hours: $2,500-$5,000 (more drying time, antimicrobial treatment)
- Act after 72+ hours: $5,000-$15,000+ (mould remediation + water damage restoration)
Thermal imaging helps you act in that first 24-48 hour window effectively by ensuring you address ALL the moisture, not just what’s visible.
The Insurance Documentation Advantage
Here’s something most homeowners don’t realize: Thermal imaging strengthens your insurance claim.
Why Insurance Assessors Trust Thermal Imaging:
Visual proof: You can show the assessor exactly where moisture was present. Not just “the carpet was wet” but “here’s the thermal image showing moisture extent.”
Scientific evidence: Thermal imaging is recognized by insurance industry as objective assessment tool. It’s not your opinion. It’s measurable data.
Documents hidden damage: When you claim for wall cavity drying or ceiling drying, thermal images prove it was necessary. Without them, assessor might question: “How do you know the walls were wet?”
Prevents claim disputes: We’ve never had an insurance assessor dispute our assessment when we provide thermal imaging documentation. The visual evidence is irrefutable.
Supports higher claim amounts: If damage is worse than visible, thermal imaging proves it. You’re not inflating the claim—you’re documenting the actual extent.
What We Include in Insurance Reports:
- Thermal images of all affected areas
- Moisture meter readings at multiple locations
- Photo documentation of equipment placement
- Daily progress reports with thermal imaging updates
- Final verification thermal images before completion
This documentation package has helped hundreds of Melbourne homeowners get their claims approved smoothly and completely.
Learn more about working with insurance after water damage
What Thermal Imaging Taught Us About Structural Drying
After 13+ years of thermal imaging, here are the patterns we’ve learned:
Discovery #1: Water Spreads Further Than You Think
On average, thermal imaging reveals affected area is 20-40% larger than visible damage suggests.
That wet patch in the corner? Thermal imaging shows moisture 2-3 meters further along the wall.
Discovery #2: Corners and Edges Dry Last
Thermal imaging consistently shows that moisture lingers in:
- Room corners
- Junctions between walls and floors
- Areas under baseboards
- Behind door frames
Why: Less airflow in these areas. More structural elements creating moisture traps.
What it means: We position drying equipment specifically to target these problem areas.
Discovery #3: Some Materials Hold Moisture Much Longer
Thermal imaging taught us drying times vary dramatically:
- Carpet surface: 24-36 hours typically
- Carpet underlay: 48-72 hours
- Timber subfloor: 3-7 days
- Wall cavities: 5-10 days
- Ceiling insulation: 7-14 days
Without thermal imaging, you might think “the carpet feels dry, job done.”
With thermal imaging, you see “the carpet is dry, but the subfloor underneath is still saturated.”
Discovery #4: Moisture Rebounds If You Pack Up Too Early
We’ve learned to do final thermal imaging scans 24 hours after we think we’re done.
Why? Because sometimes moisture from deep in the structure wicks back toward the surface after equipment is removed.
Thermal imaging catches this. We can extend drying for another day or two. Prevents callbacks and problems.
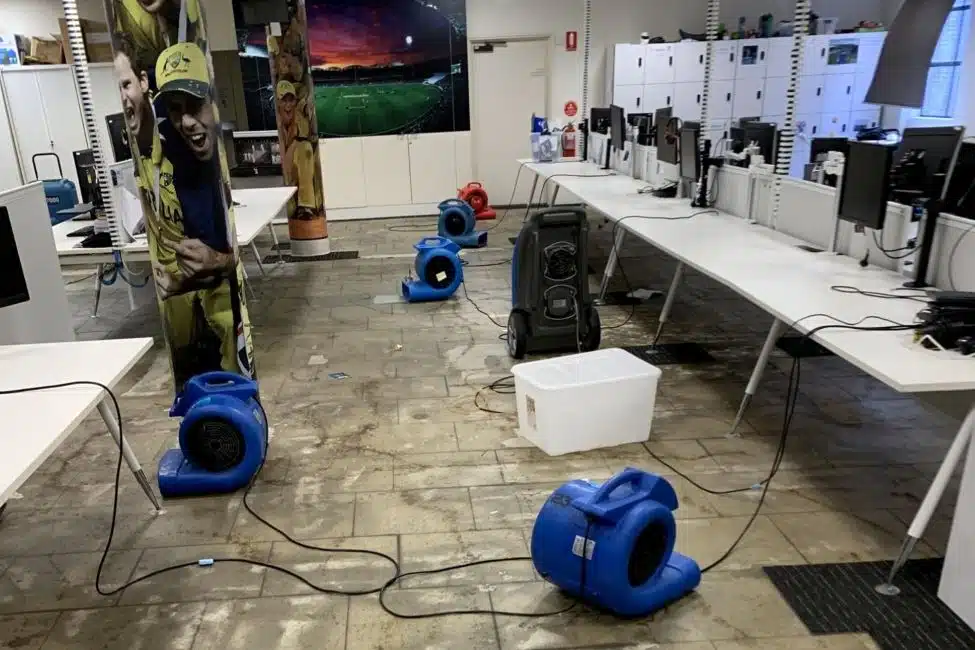
The Cricket Australia Standard: What 350m² Commercial Drying Taught Us
When Cricket Australia’s headquarters flooded (350m² affected, home to World Cup trophy and Don Bradman memorabilia), thermal imaging was essential.
Day 1: Initial thermal imaging scan revealed affected area was larger than visible water damage suggested. Water had spread under carpet tiles into areas that looked completely dry.
Days 2-13: Daily thermal imaging scans guided equipment repositioning. Showed us exactly where moisture was stubborn. Allowed us to concentrate drying efforts on problem areas.
By Day 13: Final thermal imaging scan confirmed complete drying. Every area at safe levels. No hidden moisture lurking.
Without thermal imaging: We might have dried what was visible and left hidden moisture in structural areas. Result: potential mould in Cricket Australia’s headquarters, with priceless memorabilia at risk.
With thermal imaging: Complete confidence that everything was dry. Zero risk of mould. All memorabilia protected.
Read the full Cricket Australia case study
What to Ask Your Restoration Company
If you have water damage and you’re getting quotes, here are the questions you should ask:
Question 1: “Do you use thermal imaging?”
Good answers:
- “Yes, on every water damage job.”
- “Yes, it’s included in our assessment.”
- “Yes, we’ve been using it since [year].”
Red flag answers:
- “We don’t need thermal imaging, moisture meters are enough.”
- “We can use it if you want to pay extra.”
- “We have one but don’t usually bring it.”
- “That’s overkill for residential jobs.”
Question 2: “Will you provide thermal imaging photos?”
Good answers:
- “Yes, they’re included in our report.”
- “Yes, we’ll show you the images during assessment.”
- “Yes, they’re part of your documentation package.”
Red flag answers:
- “We keep those for our records.”
- “That costs extra.”
- “You don’t need to see those.”
Question 3: “Do you use thermal imaging throughout the drying process?”
Good answers:
- “Yes, we scan initially and then monitor daily.”
- “Yes, and again at completion before we pack up.”
- “Yes, it guides our equipment placement decisions.”
Red flag answers:
- “Just at the start.”
- “Only if there’s a problem.”
- “Moisture meters are enough after initial scan.”
Question 4: “What if you find hidden moisture?”
Good answers:
- “We adjust our drying plan to address it.”
- “We’ll explain what we found and why it needs attention.”
- “We’ll provide quote for addressing hidden damage.”
Red flag answers:
- “That rarely happens.”
- “We’ll deal with that if it becomes a problem.”
- “You can call us back if mould develops.”
The right restoration company uses thermal imaging proactively, not reluctantly.
When Thermal Imaging Is Essential (vs Nice to Have)
Not every water damage job requires thermal imaging. Let me be honest about when it’s essential vs when it’s optional:
ESSENTIAL – Always Use Thermal Imaging:
✅ Category 2 or 3 water (grey water, sewage) – contamination can spread invisibly
✅ Multiple rooms affected – need to map extent accurately
✅ Walls or ceilings potentially affected – can’t see inside cavities without it
✅ Structural drying required – subfloors, wall cavities, ceiling spaces
✅ High-value properties – risk of expensive problems too high to skip
✅ Commercial properties – business continuity depends on complete solution
✅ Insurance claims – documentation strengthens claim
✅ Any situation where it’s been >24 hours since water damage occurred
Optional – Moisture Meters Might Be Sufficient:
- Very small, isolated leak (under 1m²)
- Caught immediately (within 1 hour)
- Clean water only (Category 1)
- Surface damage only (no possibility of wall/ceiling penetration)
- Customer budget extremely limited
Our policy: We use thermal imaging on every structural drying job. No exceptions. The cost of the technology is a tiny fraction of the cost of missing hidden moisture.
The Real Cost of Missing Hidden Moisture
Let me paint two scenarios based on real jobs we’ve done:
Scenario A: Without Thermal Imaging
Day 1: Small burst pipe in bathroom. Water on floor. Restoration company extracts water from bathroom carpet. Sets up fans. “Looks good!”
Day 3: Restoration company removes equipment. Carpet feels dry. Job complete. Invoice: $1,200.
Week 2: Homeowner notices musty smell near bathroom.
Week 3: Small black spots appearing on baseboard.
Week 4: Calls different restoration company. Mould assessment reveals mould growing in wall cavity behind baseboard. Original water damage spread into walls but was never dried.
Final cost:
- Original water extraction: $1,200
- Mould remediation: $6,500 (remove baseboards, treat mould, dry walls, replace)
- Total: $7,700
- Plus: Health risk to family, stress, disruption
Scenario B: With Thermal Imaging
Day 1: Same burst pipe. Same visible water damage. But restoration company uses thermal imaging. Scan reveals water has spread 1 meter along wall cavity behind baseboard.
Day 1 (continued): Restoration company explains findings. Recommends wall cavity drying. Removes baseboards. Installs air injection to dry wall cavity.
Days 2-6: Daily monitoring with thermal imaging and moisture meters. Equipment repositioned as needed.
Day 7: Final thermal imaging and moisture verification. Everything at safe levels. Baseboards reinstalled.
Final cost:
- Water extraction + wall cavity drying: $2,800
- Total: $2,800
- Plus: Zero mould, zero health risk, complete solution first time
Thermal imaging adds maybe $500-800 to the job cost.
It prevents $5,000-10,000 in mould remediation.
That’s a 600-1,200% return on investment.
Why We’ve Used Thermal Imaging Since 2011
In 2011, Richard made a decision that changed how we operate.
He invested in professional thermal imaging equipment. Not because clients demanded it. Not because competitors were doing it. But because “if you want to do a job right, it’s essential for a professional restoration technician.”
That decision has:
- Prevented dozens (probably hundreds) of mould disasters
- Saved clients millions in avoided remediation costs
- Strengthened countless insurance claims
- Built our reputation for thoroughness
- Made us better at our jobs
Could we operate without thermal imaging? Sure. Lots of companies do.
Would we want to? Absolutely not.
Because once you’ve seen what thermal imaging reveals—the hidden moisture, the extent of damage, the problems waiting to happen—you can’t unsee it.
And you can’t go back to guessing.
What Melbourne Homeowners Say About Our Thorough Approach
“I am beyond grateful for Richard and his team. Not only were they quick to reply, their assistance in explaining every step of the cleanup, what needed to be done and the extra support to assist me with the insurance claim was above and beyond. The follow up to ensure all insurance issues were met was exceptional. Thank you all so much.”
— Sonia C., Melbourne
“Richard and Chris arrived within a few hours and walked me through the problem and what we should do to fix it. They talked me out of spending more money on a service I didn’t need, and their pricing was so much more affordable than other providers. Really grateful for their attentiveness and generosity.”
— Liam E., Melbourne
The Bottom Line
After 13+ years using thermal imaging for water damage restoration, here’s what I want you to remember:
Your naked eye cannot map where water has gone. It can’t see through walls. Can’t see into ceiling cavities. Can’t see under floorboards. Can’t see behind baseboards.
Thermal imaging reveals the truth. Where moisture is hiding. How far it’s spread. What needs drying that you can’t see.
The cost of missing hidden moisture is always higher than the cost of finding it. Mould remediation costs 3-5 times more than proper initial drying.
Some restoration companies avoid thermal imaging because it reveals more work. We use it because it reveals the complete picture.
For structural drying jobs, thermal imaging isn’t optional. It’s how you do the job right.
Need Water Damage Assessment With Thermal Imaging?
Emergency water extraction: 1300 682 563
✓ Thermal imaging on every structural drying job
✓ Combined with calibrated moisture meters
✓ Complete documentation for insurance
✓ Daily monitoring until verified dry
✓ 13+ years thermal imaging experience
✓ Serving Metro Melbourne & Mornington Peninsula
Or learn more:
- Emergency Water Extraction Services
- Our Professional Equipment & Technology
- How We Dried Cricket Australia’s Headquarters
- What Does Water Damage Cost in Melbourne?
Free assessment: Even if you’re not sure if you need thermal imaging, call for free advice: 1300 682 563
Richard will explain what’s needed for your specific situation. Honest advice, no pressure.
About The Squeaky Clean Team
Since 2007, we’ve restored over 5,000 Melbourne properties using scientific moisture detection methods. We’ve been using thermal imaging since 2011—longer than most competitors. IICRC certified. Trusted by Cricket Australia. Backed by 100+ five-star Google reviews.
Emergency number: 1300 682 563
Email: sales@squeakycleanteam.com.au
Address: 219/87 High St, Prahran VIC 3181